Useful Tips And Tricks

Showing posts with label How To's. Show all posts

Thursday, 24 March 2016

Write High Converting Product Descriptions for Your eCommerce Store

        Write High Converting Product Descriptions for Your                                             eCommerce Store

Commece is growing at an exponential rate across the globe. In the US alone, eCommerce sales are expected to top $20 trillion by 2020. To benefit from this growth trend, you need to ensure that your eCommerce store is fully optimized to attract visitors and convert them into buyers.
Among several other things, a key factor that impacts your e-commerce sales is the quality of your product descriptions.
It does the job that a well-qualified salesperson would do in a physical retail outlet, and is often the difference between potential buyers bouncing back from your website, and casual visitors turning into buyers.
So, what exactly constitutes a high quality and conversion focused product description?
If you follow these steps, creating a seductive product description won’t be that hard.

Identify Your Ideal Buyer Persona

Before you even start describing your product, you need to clearly identify your ideal buyer persona.
A buyer persona is a sample profile of your ideal buyer. This is the person for whom your product is important, and who is willing to spend money on it.
You need to list down the key characteristics of your ideal buyer so that you can clearly identify and target him while writing your product description.
A typical buyer persona includes details like the gender of your buyer, income bracket, career level, interests, hobbies, likes and dislikes, their problems that your product solves and the phrases and words they use to describe their problems etc.
The more detailed your buyer persona, the better.
Keep this imaginary buyer in mind while writing your product description.
As you move forward, make more sales and learn more about your buyers, you can keep improving this buyer persona and make the necessary adjustments to your product descriptions.

Focus on the Benefits of Your Product and the Problems It Solves

Perhaps the most frequent mistake I see in product descriptions is the unnecessary focus on product features.
Features are important, no question about it. But you need to show your potential buyers a direct relationship between your product features and the solution to their problems.
In other words, focus on the benefits of your product instead of its features. Always state the benefits of your product before its features.
For example, instead of directly listing the technical details on the resolution, pixels and display quality of a smartphone, tell your buyers how your smartphone brand allows users to read messages without screen glare, under sunlight, saving them from eye strain and headache.
This is just one example.
When you start writing a product description, first list down all its features separately. Now translate each feature into a benefit.
You’ll be surprised how powerful and convincing your product descriptions can become with this simple change of mindset.

Use Benefit Driven Images of Your Product

A winning product description is incomplete without relevant and high quality product images. Images become even more important when you have specialized products and not just some decorative items like furniture and LCDs.
For example Nielson conducted a study in which they compared the behaviors of two different sets of buyers looking for bookshelves and LCD TVs.
They noted that on average users spent almost 82% of their time reading the text description of the product, while 18% of the time was spent examining product images. However, images for bookshelves were examined in much more detail as compared to generic items like LCD TVs.
So if you have a specialized product, images become much more important.
But for maximum impact, make sure you add multiple product images with your product description.
Add images that demonstrate different practical uses of your product. Also add a few close up images of the product that give a good look of your product to the buyer.

Cut Down on Meaningless Statements and Jargon

What exactly are you telling your prospective buyer when you say your product has excellent quality?
Is a seller supposed to say anything else?
These are obvious statements that buyers usually ignore because no one describes their product as poor quality.
You need to cut down on these obvious statements and instead focus on highlighting the key benefits of your product that reflect high quality.
For example, nowhere in this product description will you find claims about product quality. Yet, the overall product description gives you a strong impression of high quality.
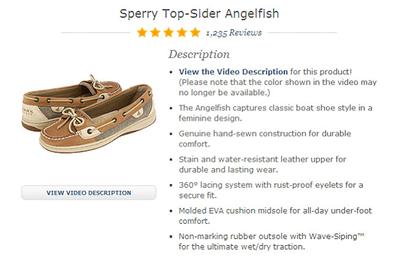
good-example-ecommerce-product-description
Instead of stating the obvious by claiming high quality standards, try highlighting why your product is high quality. Focus on its unique selling points (USPs) and tell the buyer why you’re a better choice.

Create Content That Can Be Scanned Easily

Modern day internet users are short on time, and usually skim through content instead of reading each and every word.
Writing your product descriptions as one large block of text discourages your buyers from reading it completely.
Instead, intelligently highlight the key areas of your product descriptions and segment your content properly. Make it easy to scan for your readers and help them find what they’re looking for.
To achieve this, use short paragraphs (2-3 lines) in your product descriptions, highlight important features and benefits by making them bold or italic, use bullet points, headings and sub headings etc.
The objective here is to make it as convenient as possible for your buyers to identify the key benefits they’re getting from your product.
A properly formatted product description can prove to be the difference between an unconvinced prospect and a potentially long term customer.

Optimize Your Product Descriptions for Search Engines

No matter what products you sell and which region you target, if you have an e-commerce store, search engine traffic is crucial for your sales.
So naturally, optimizing your product descriptions for search engines, is important.
But most of your potential customers are unaware of your brand name. They also don’t know the branded names of your products.
All they know is that they have a problem, and they need a solution for it.
That is why it is absolutely critical that you optimize your product descriptions around the needs of your customers, not the brand name of your product.
Use selected keywords in your product descriptions that your client use to describe their need.
Think from your buyer’s perspective and write in their language.
But make sure you don’t overuse keywords because that can kill your voice in the product description and make it less persuasive.

Wrapping Up

A product description is your sales pitch to potential buyers. You need to make it as persuasive, understandable and engaging as possible. By applying the techniques I’ve discussed in this post, I am sure you can make your product descriptions much more effective in the long run.
What are some of the other ways you have seen brands and e-commerce stores make product descriptions more persuasive?
I’d love to hear your thoughts in the comments.

Tuesday, 22 March 2016

How to Find and Reinstall Uninstalled Android Apps in Google Play Store

                    How to Find and Reinstall Uninstalled Android Apps in Google Play Store

With over millions of apps available on the play store, we often install plenty of apps or games to check them out and Uninstall them when they are no longer needed. But what if you happen to want an uninstalled app or game back, and you forgot the name? Looking for that app on Play store would be like looking for a needle in a haystack. Fortunately,Google Play Store has an option to let you see all of your uninstalled apps, alongside the installed ones.
To access it, open the Google Play Store app and tap on the ‘menu’ button (the three lines on the upper left-hand corner). When the menu is revealed, tap on ‘My Apps & Games’.
On this page, you will see two sections: Installed and All. Go to the “All” section. Here you can see all the apps and games, both installed and uninstalled, on your smartphone. Apps that have been uninstalled are marked as “FREE”.
If you do find an app that you want to recover, simply tap on it, and you will be taken to the app page where you can reinstall it.
If you no longer want an uninstalled app to be on the ;ist, you can remove it by taping on the ‘X’ button that you can see in its upper right corner.


How To Use Two WhatsApp Accounts in A Single Android Phone

How To Use Two WhatsApp Accounts in A Single Android Phone


Hello fellow followers and blog readers i have decided to bring something useful information to you guys by writing some tutorials, tips and tricks so you guys can make full out of your Android phones. And believe you are going to love whatever i have planned to post. It’s me Riaz Hussain and i will be writing these kinda posts frequently whenever i get spare times so make sure to check Tips and Trick Site whenever you want to.
This Time i am going to show you how to use two Application Accounts in a single Android phone. you guy have been wanting to use two applications in a single Android phones but what if you can use that single application but with two accounts in there? like you are using a whatsapp and you want to Another number in same whatsapp application, now you can do those things using an Application that requires no Root Permission at all. and that’s Parallel Space-Multi Accounts. using this application you can simply use two accounts in any of the Application of games. like let’s have an example i am playing Clash Of Clans, basically everyone does this time we are more bonded with the clash royale though. you have two accounts in Clash OF Clan or Clash Royale and you are changing accounts frequently using your Google IDs it must be tired. but using Parallel Space you can simply switch your game IDs easily.
Tutorial:
Simply Get the Parallel Space from play store or from the link down below and install it
Open the APP and select APPLICATION which you want to use
Once you have selected the app, that particular app will appear in the Parallel Space Application
Now what you have to do is just open that Parallel Space and open that application that’s it and you are good to go
Next Big Point about this app is its clean, no advertisements , no IAPs and no adwares at all. Its completely clean and you can trust on it. so go and use your Two Whatsapp accounts in your single Android phone or switch gaming accounts easily. and yes if you already know about this app then ignore it. It’s not for you. well enjoy it and wait for more tutorials which is coming soon. so stay tuned.
Download Links:

Monday, 21 March 2016

How To Increase the Consumption of Your Blog Content


How To Increase the Consumption of Your Blog Content

Creating quality content requires alot of time and effort. A well researched 1000-1500 word blog post can take you between 2 to 5 hours (sometimes even more) to write.
But is your hard work really worth it? Is anyone reading your content?
According to Hubspot, more than 60% of readers never read more than 40% of a blog post. That means most of your content never gets consumed.
The “time on page” of your individual blog posts is a good indicator of how much of your content is actually getting consumed.
But increasing content consumption is not as difficult as you might think.
Neil Patel, a leading content marketer, increased his time on page by almost 70% by making just a few tweaks to his content format. Many other leading bloggers have reported similar successes by restructuring their content.
Here’s how you can replicate their success, and increase the consumption of your blog content.

Minimize Design Distractions

You blog design has a direct impact on the readability of your content. A clean, clutter free and focused blog design allows your readers to consume content much more effectively.
So even before you start writing content, make sure your side bar has no unnecessary elements, your navigation menu is small and to the point, and your headings and body text size is large enough with proper spacing.

Create the Right Type of Content

There are certain content types that people prefer to read and share. And depending on your niche, there are always certain topics that have a higher demand as compared to the others.
For example, research by AppSumo indicates that list posts, ultimate guides and expert round up posts get the highest social shares.
So instead of guessing and experimenting unnecessarily, create the content types with a higher success rate. To find more niche specific insights, search the Ahrefs content explorer tool with your main keyword. It will show you the most popular posts related to your topic.
Go through the top posts to get a good idea of the idea of the kind of content you need to create in order to attract more readers.

Use Magnetic Headlines

Research indicates that out of all the people who read your post headline, only 20% actually click it to read your post.
A poor headline can waste hours of hard work that you put into creating awesome content. That is why some of the most successful bloggers spend almost as much time crafting headlines as the total writing time of their posts.
Here are a few things you should do to create magnetic headlines
  • Keep your headlines to 65 characters (they have the highest conversion rates)
  • Limit your headlines to 6 words for maximum impact
  • Use adjectives to create impact with headlines (e.g powerful, effective, supreme etc)
  • Use numbers and percentages in your headlines to create credibility
  • Use the words I, You, What, Why, How in your headlines
Your headlines have a huge impact on your content consumption rate. So make sure you get them right.

Always Think Mobile First

More than 60% of Google searches are now generated from mobile devices. But the number of mobile users is even higher when it comes to blog readers.
Almost everyone reads blogs on smartphones these days. So you need to make sure that your design is responsive, and optimized for mobile visitors.
If you have any pop-up plugins on your blog, make sure they’re inactive for mobile readers because pop-us can be really annoying on mobile.
Also ensure that your social media sharing widgets, and comment plugins are mobile responsive.
All these things impact your content consumption rate.

Create a Killer Intro by Making a Promise and Giving Incentives

When a visitor lands on your blog, you have approximately 3 seconds to grab his attention and persuade him to read the rest of your blog post.
Most bloggers fail to do that.
Why? Because their blog posts have boring introductions.
Here’s how to write engaging introductions
  • Expand on the problem mentioned in your headline. Give them a summary, without going into too much detail.
  • Get to the point straightaway. Your readers don’t have time for long introductions. Just tell them what value your post has for them.
  • Clearly identify your post’s objective, make a promise and give readers a glimpse of the solution
  • Give them an incentive to read till the end. For example, you could say
“Here are 7 ways you can increase website conversions (plus link to a free conversion optimization tool at the end that’ll blow you away)”

Tell Readers What They’ll Learn

When you write long and resourceful blog posts, it’s always good to provide a skeleton view of the post at the start.
This allows the readers to identify the sections they want to read, and also gives them an immediate idea of the value your post has to offer.
You can do this simply by creating a “What You’ll Learn in This Post” section and list down the main sub-headings of the post.
You can even link each heading to the relevant portion of the post allowing readers to quickly jump spaces.

Use Short Paragraphs

Modern day internet users are short on time. Most of them skim through blog posts instead of reading every word.
If your post has paragraphs longer than 2-3 sentences, skimming will become hard for your readers. So you need to make sure that you mix up shorter paragraphs with the occasional longer ones.
For example, you could keep the average paragraph size to 2-3 lines and insert a couple of 4-5 line paragraphs in between.

Talk to Your Readers

Blogging is different from conventional article writing. Instead of writing from a third person perspective, you need to talk to your readers directly.
For this, make use of words like I, You and Me frequently. Use short sentences and avoid using heavy vocabulary.
When you’re writing, talk to only one person – your reader – not a group.couple of 4-5 line paragraphs in between.

Use Sub-Headings Frequently

Intelligent use of sub-heading throughout your blog post can significantly increase its consumption. Sub-headings give your readers a clear idea of your post’s distribution and what each section of the content has to offer.
It also allows readers to easily skim through the post and jump to any particular topic they want to know about.

Quote Experts and Cite Credible Research

Backing your arguments with credible data and research can add a lot of weight to your blog posts. Instead of making a claim all by yourself, include relevant number and studies that verify your claims.
Quotes from experts and renowned industry figures also has the same impact. When you add them to your content, it gives credibility to your arguments.

Add Images, Infographics and Memes

Did you know that almost 65% of readers prefer infographics, memes and images in blog posts?
Visual content makes your blog posts much more attractive and digestible. Instead of just throwing a wall of text on your readers, add images to the mix.
Relevant and high quality images can complement your content and make it much more effective.

Provide an Actionable Summary at the End

Just like the introduction, a good actionable conclusion is also good for your blog post. It should effectively summarize all the key points of your post, and its key takeaways.
An effective conclusion also drives action from the readers (for example, a comment or a share).

Wrapping Up

Increasing the consumption of your blog content depends heavily on user experience and the type of content you create. If you can identify the topics that your audience loves to read about, and structure your posts in a reader friendly manner, there’s no reason why you can’t make readers stay on your site longer.
How do you ensure that your readers consume your blog posts to the fullest? I’d love to hear your thoughts in the comments.

How to Store and Play Music on Your Android Wear Smartwatch

                             How to Store and Play Music on Your Android Wear Smartwatch


Google has just released an update to Android Wear that allows users to store and play music on their smart watch. You can download songs directly to your smart watch, and then play them via compatible Bluetooth headphones. This is a useful new Android Wear feature that is especially beneficial if you feel like listening to music while jogging or working out in the gym but don’t want to carry your phone around. Here’s how to play music on your smartwatch using Android Wear.

Requirements

  • Make sure your smartwatch is updated to the latest version of the Android Wear OS. The current version is 4.4W.2 (head to Settings -> About to check it).
  • Having the latest version of google play music app on your Android phone.
  • A set of Bluetooth headphones.

How to Set up Android Wear to Store and Play Music Directly from Your Watch

First, activate Bluetooth on your smartphone and connect your smartwatch. After you’ve got your watch paired with your phone, launch the ‘Play Music’ app on your Android device and navigate to ‘Settings’, then tick the box next to ‘Download to Android Wear’
How to Store and Play Music on Your Android Wear Smartwatch
If you have any music stored on your device, the music will begin transferring to your watch automatically. If you don’t, however, you’ll need to download music either from your library or the Play Music Store. You can download music by viewing a playlist, song or entire album and tapping on the three-dot menu icon. From the list, select ‘Download’. Depending on the amount of songs that you’re going to download, this process will take several minutes.
How to Store and Play Music on Your Android Wear Smartwatch
When the download is complete, you’ll need to pair your smartwatch with your Bluetooth headphones. To do this, touch once on the screen of the watch, and scroll down to ‘Settings’, and then select ‘Bluetooth devices’. The watch will look for your headphones (which need to be turned on to be discoverable), and you’ll need to touch the headphones’ name when it pops up on the watch’s display.
How to Store and Play Music on Your Android Wear Smartwatch
To play the music, touch again on the screen to enter the menu, find and touch ‘Start…’, and then touch ‘Play Music’. You will see the music you’ve downloaded with a “Play” button. Touch on it to start listening. While the song is playing, you can swipe from right to left to access playback options and volume controls on the watch face.
How to Store and Play Music on Your Android Wear Smartwatch
To remove tracks from your watch, you must connect your watch with your phone, and then open the ‘Play Music’ app and find ‘Settings’. Uncheck ‘Download to Android Wear’ and your music will be removed from your watch.

How to Root Almost Any Android Device with One-Click Method

                            How to Root Almost Any Android Device with One-Click Method


Before I explain how to root an Android device, I want to explain what “rooting” is and what are the advantages and disadvantages of rooting your device.

What is Rooting?

Rooting is the process for getting all the privileges and access to an android functionality to get the most out of your android device. By rooting your device, you can modify or delete the system files which in the default mode (unroot), the files can’t be accessed.

The Advantages of Rooting

There are many advantages of rooting, including:
  • Run special applications
    Once you’ve rooted your device, you can run special app that require root access on your device. When compared to regular applications, root applications provide more features.
  • Custom ROMs
    This is the most powerful feature of rooted phones or tablets. There are hundreds of custom ROMS available that can change the entire look and increase the performance of your Android device. With the help of this custom ROMs, user can also load newest available Android versions.
  • Custom themes
    After rooting your Android device, you can fully customize the theme of your android device. You can load custom themes available free on internet to give your device a fresh look.
  • Free internal space
    People who have low internal memory’s phone like Samsung Galaxy Y can transfer any application from internal to SD card after rooting their phone. This will Speed Up Your Phones Perfomance

The Disadvantages of Rooting

The following are some disadvantages of rooting:
  • Voids your phone’s warranty
    Once rooted, the warrant provided by the phone company is completely void. While you can unroot your phone, but in most of the phone there is no going back. So, don’t try to root your android phone when in warrant.
  • Brick your phone
    Bricking of device means screwing up of phone software so badly that phone can no longer able to perform its function and phone becomes a dead phone which is also known as bricked phone. But most bricked phones can be unbricked.
  • Vulnerable to virus attack
    There is an increased risk when some malicious apps are installed. Although malicious app on the rooted phone or tablet has not really been a problem yet, but it can be in the future.
  • Overcloaking
    This may cause the device overheat and explode even in some extreme causes.
I’ve explained the advantages and disadvantages of rooting an Android device. Now the decision is in your hands. If you think that rooting the device is worth, then go ahead by following the instructions below.

Preparation Before Rooting Your Android Phone

Before you continue, make sure that you’ve follow these tips before proceeding with the rooting process.
  • Charge your phone at least 50%.
  • Create a complete backup of your Android device.
  • Ensure that your device is listed in the supported devices here. If your device isn’t in the list, you can contact Kingo team to ask whether your device is supported or not.

Steps To Root Your Android Device

1.Download Kingo Root Tool here and install it on your PC.

  1. Run the Kingo Android Root tool.
  2. Enable USB Debugging on your phone. You can find this option under Settings ->Developer options, then tick on “USB debugging”.
  3. Plug your Android phone or tablet to your PC via USB cable.
  4. If your device driver is not installed on your PC, Kingo will install it for you automatically. Make sure your PC is connected to the Internet so that device driver can be Downloaded.
  5. After a moment, you’ll get an Allow USB debugging message on your Android device. Tick “Always allow from this computer”, and then tap ‘OK’.
How to Root Almost Any Android Device
7. You’ll now see your device’s name and root status. Make sure that you read the root notifications. When you’re ready, click on the ‘ROOT’ button and wait until the rooting process complete.
How to Root Almost Any Android Device
8. If rooting is successful, you’ll get a “Root Succeeded!” message. Click on the ‘Finish’ button. Your phone will now reboot. That’s it!
How to Root Almost Any Android Device
9. You have successfully rooted your Android device and you can now make the most out of it.

5 Easy Ways to Prevent Android Malware

       5 Easy Ways to Prevent Android Malware

Malware is a malicious software that is designed to damage or disrupt the system of your computer or mobile device. They include virus, spyware, Trojan horses and more. Once the malware enters the mobile phones, it can perform a variety of unwanted activities like stealing your important data or contact list, disrupt the operation of your phone, and even steal your money by making unwanted calls or sending SMS messages.
Among the mobile phones malware attacks, Android is the most targeted mobile operating system by malware developers and hackers. Fortunately, there are several steps that you can take to prevent the malware from infiltrating your Android device.
  1. Don’t install and download apps from unknown sources unless you are sure it is safe
    Many apps from unknown sources contain malware that once installed can steal information and cause harm to your device. So never download and install apps from outside of Google play and Amazon App store for Android unless you’re sure that the site is safe for download.
  2. Check the reviews and ratings of the app by other users
    Before downloading an app, read the reviews from other users as people will give a negative review and low rating if the app contains malware.
  3. Understand app permissions before accepting them
    Permissions are a key to any mobile application. These permissions are crucial to the overall security of your system. If any of the permissions seem a little odd, such as a wallpaper app wanting to make phone calls or send SMS messages, then it’s best to not install the app.
  4. Install an Antivirus app on your device
    Make sure that you have an antivirus app installed on your Android device. The tools can detect potential phishing websites, provides information about the kind of permissions other apps are requesting, and have anti-loss tool that can help to locate your lost or stolen android device
  5. Don’t root the device
    Rooting an Android device does has some advantages. However, this break the security model and allowing all apps, including malicious app, to access the data owned by other applications.